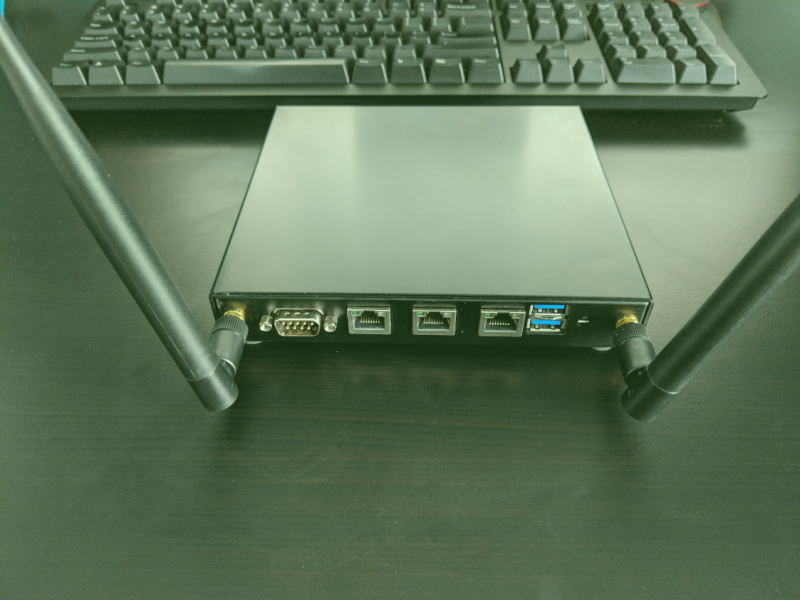
Adding WiFi Card to Alix apu Running pfSense

I always thought it would be neat to manage my home WiFi from the same interface as the rest of my network. After eyeing the hardware for a long time and doing some research every couple months or so, I finally made the leap and purchased the necessary hardware.

As I’m using an Alix apu2c2, some initial research showed that the WLE200NX coupled with a pair of 6dBi antennas was the way to go. 

After backing up my pfSense config (ALWAYS make a backup!) I shut it down and cracked it open to install the WiFi card.

This was mostly trivial, note that we use the third (mPCIe 1) slot for this. The first slot is for an mSATA drive.

All set, ready to power up and get it configured!

Head over to Interfaces -> Assignments then down to the Wireless tab. Click Add, select the detected device and set the mode to ‘Access Point‘. Then, click Save.

Head back to Interfaces -> Assignments and create a new interface, selecting new WiFi device.


Now, click on the newly created interface (OPT1, likely) and configure it like any other interface. Note, because it’s a wireless interface, you’re presented with a LOT more options as your scroll further down. Here’s, where you configure Channel, SSID, WPA2, etc…

Once you have everything configured, head over to Services -> DHCP Server and configure the DHCP server for your new interface.

Okay, just about done. All we have to do now is let traffic pass through the interface. To do so, head over to Firewall -> Rules and click your new WiFi interface. Below, you see I just added a quick ‘Allow All’ rule to make sure everything works as expected.

Testing this with both my phone and my laptop, I couldn’t be happier with the results!

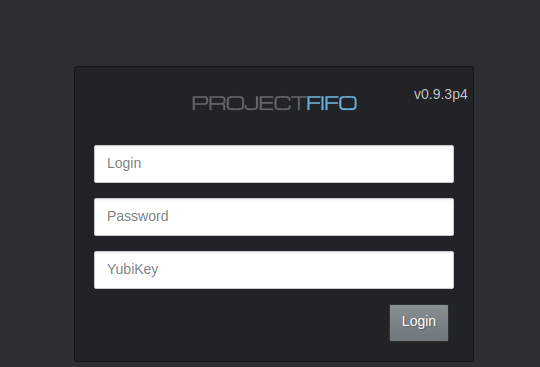
Change theme for project-fifo Web UI

Exploring more of Project-Fifo, I happened upon this gem.  You can change the web UI theme!

Log into your fifo server and edit /opt/local/fifo-cerberus/config/config.js then simply set the theme to dark.

var Config = {
    theme: "dark"
};

Clear your browser cache and reload the WebUI. Here’s what it will look like.

If you want to customize the theme further, you can edit /opt/local/fifo-cerberrus/css/dark.css (if you’re using the dark theme). If you want to edit the default theme, you’d want to edit /opt/local/fifo-cerberrus/css/style.css .

Setup Package Cache Server on Ubuntu 18.04

If you’re like me and have several Debian/Ubuntu machines on your network there’s going to come a time when you need to upgrade them. Doing so, will use up a lot of bandwidth while every machine will likely be downloading the same packages. This may or may not upset your significant other who’s binge-watching Gilmore Girls on Netflix.

Since you’ve slowed the Internet down to a crawl, this it might  be a good excuse to leave the computer and get outside for some fresh air. HA, who am I kidding, we got stuff to do. Let’s setup a cache!

Here, I’ll be using Ubuntu 18.04 LTS and setting up apt-cacher-ng.

While we could setup Squid to function in the same way, and cache way more than just debian/ubuntu packages, using apt-cacher-ng is a quick win and requires hardly any configuration to get going. Maybew I’ll cover how to setup Squid in a future post.

First, we’ll make sure everything is up to date, then install apt-cacher-ng.

sudo apt-get update
sudo apt-get dist-upgrade -y
sudo apt-get install apt-cacher-ng -y

Let’s go over a few config options. We won’t go over every single one, just the ones that might be relevant. Open /etc/apt-cacher-ng/acng.conf using your favorite text editor and let’s start.

CacheDir. This is where acng will actually do its caching and store packages as they’re downloaded. You may want to change this if you’d like to save packages to a different partition with more space.

CacheDir: /var/cache/apt-cacher-ng

Port. Here, you can change the TCP port apt-cacher will listen on. Note, this should be higher than 1024. Otherwise, you would need to run acng as root.

Port: 3142

BindAddress. If you have a multi-honed server with several IP addresses, you might want acng to only listen on one. Just provide the IP here to do so. By default, it will listen on all interfaces (0.0.0.0).

BindAddress

ReportPage. If you’d like to see some misc statistics about the caching of packages (hit/miss ratio, space usage, etc…) set the page name here. To disable it, just comment out this line.

ReportPage: acng-report.html

Here’s how the page looks from my server:

ExThreshold. The number of days before deleting unreferenced files. You may want to tweak this to cache packages for longer periods of time.

ExTreshhold: 4

MaxDlSpeed. Here, you can limit how much bandwidth acng will use up. Very handy in some environments. Units are KiB/s.

MaxDlSpeed: 250

There are several other options layed out in the config file, feel free to read more on them and tweak as needed. For now, let’s move onto setting up our hosts to point at our new cache server for packages.

Log into one of your Ubuntu/Debian machines and create a new file at /etc/apt/apt.conf.d/21acng. Replace SERVER_IP with the IP address of the cache server you setup. If you specified a BindAddress above, use that one instead.

echo '"Acquire::HTTP::proxy "http://SERVER_IP:3142";' | sudo tee /etc/apt/apt.conf.d/21acng

Now, let’s try it out! From this client machine, run:

sudo apt-get update

Back on the caching server, you can see what’s happening by tailing the log file.

sudo tail -f /var/log/apt-cacher-ng/apt-cacher.log
.......
............
1532529680|O|227|10.137.5.1|ppa.launchpad.net/openjdk-r/ppa/ubuntu/dists/bionic/InRelease
1532529680|O|228|10.137.5.1|packages.cloud.google.com/apt/dists/cloud-sdk-bionic/InRelease
1532529680|O|217|10.137.5.1|dl.google.com/linux/chrome/deb/dists/stable/Release
.........
..............

Don’t forget, you can access the statistics page by opening a web browser to http://SERVER_IP:3142/acng-report.html