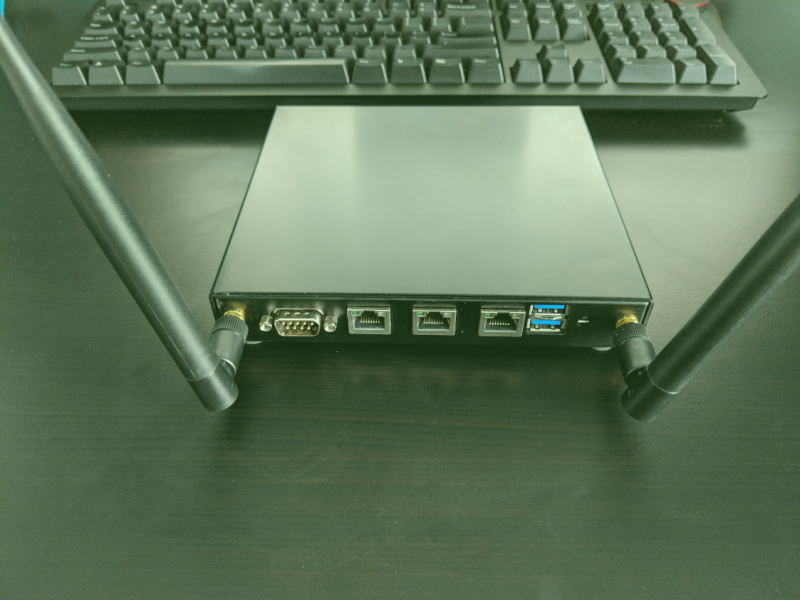
SmartOS on Alix APU2c2

Over the past few years, I’ve been using SmartOS as my hypervisor of choice coupled with a management layer called Project-Fifo. I have to say, it’s been a joy to work with.

I had a couple Alix APU’s laying around and was curious how well SmartOS would run it.

To begin, I downloaded the SmartOS USB image and pushed onto a USB drive.

wget https://us-east.manta.joyent.com/Joyent_Dev/public/SmartOS/smartos-latest-USB.img.bz2

bzcat smartos-latest-USB.img.bz2 | dd of=/dev/sdb conv=fdatasync

Now,  we can plug the USB drive into the USB port of our APU then power it up. Be sure to plug in your serial cable first so you can see what’s going on.

Soon as you see the GRUB boot menu, press ‘c’ enter the below to switch the console output to ttya from vga. Then hit enter.

variable os_console ttya

After doing the above, you should see something like this

And eventually this. You can now follow along and configure your new SmartMachine.

After networking is all configured, you’ll be prompted to layout a zpool on your disk (hopefully you have an m-sata installed).

Now, just hit enter and be sure to remove the USB drive so SmartOS will boot from the m-sata drive. Eventually, you’ll be presented with the login screen like the below where you can login as root using the password you provided during setup.

Okay, so let’s import a debian dataset and spin up a zone (read: container)

Define the zone config and use vmadm to create it and login!

Cool! A fully functioning Debian 9 container. Let’s setup wordpress and run a load test for funsies.


Now, let’s use Siege to perform some load testing

Not Bad!

Adding WiFi Card to Alix apu Running pfSense

I always thought it would be neat to manage my home WiFi from the same interface as the rest of my network. After eyeing the hardware for a long time and doing some research every couple months or so, I finally made the leap and purchased the necessary hardware.

As I’m using an Alix apu2c2, some initial research showed that the WLE200NX coupled with a pair of 6dBi antennas was the way to go. 

After backing up my pfSense config (ALWAYS make a backup!) I shut it down and cracked it open to install the WiFi card.

This was mostly trivial, note that we use the third (mPCIe 1) slot for this. The first slot is for an mSATA drive.

All set, ready to power up and get it configured!

Head over to Interfaces -> Assignments then down to the Wireless tab. Click Add, select the detected device and set the mode to ‘Access Point‘. Then, click Save.

Head back to Interfaces -> Assignments and create a new interface, selecting new WiFi device.


Now, click on the newly created interface (OPT1, likely) and configure it like any other interface. Note, because it’s a wireless interface, you’re presented with a LOT more options as your scroll further down. Here’s, where you configure Channel, SSID, WPA2, etc…

Once you have everything configured, head over to Services -> DHCP Server and configure the DHCP server for your new interface.

Okay, just about done. All we have to do now is let traffic pass through the interface. To do so, head over to Firewall -> Rules and click your new WiFi interface. Below, you see I just added a quick ‘Allow All’ rule to make sure everything works as expected.

Testing this with both my phone and my laptop, I couldn’t be happier with the results!

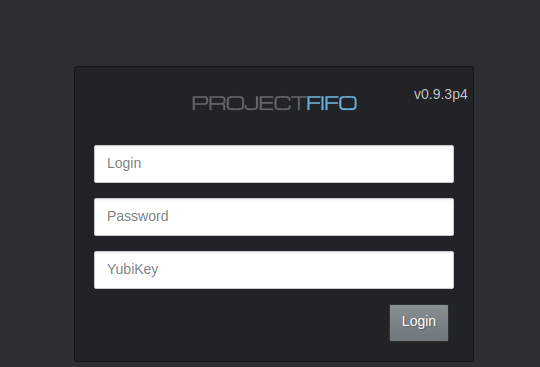
Change theme for project-fifo Web UI

Exploring more of Project-Fifo, I happened upon this gem.  You can change the web UI theme!

Log into your fifo server and edit /opt/local/fifo-cerberus/config/config.js then simply set the theme to dark.

var Config = {
    theme: "dark"
};

Clear your browser cache and reload the WebUI. Here’s what it will look like.

If you want to customize the theme further, you can edit /opt/local/fifo-cerberrus/css/dark.css (if you’re using the dark theme). If you want to edit the default theme, you’d want to edit /opt/local/fifo-cerberrus/css/style.css .

The home lab

After reading about others home lab environments, I was inspired to write about mine. It’s nothing too fancy but maybe somebody out there will find it interesting.

I’ve flipped-flopped several times between various operating systems and hypervisors trying to find the solution that best fits my needs. I’ve tried everything from pure Debian (kvm/libvirt, lxc), and Ubuntu (kvm/libvirt, lxd), to FreeBSD 11 (jails, bhyve), and SmartOS (zones, kvm).

At this point, I’ve settled on SmartOS, using project-fifo for my management layer and scheduler. I briefly tried out Joyent’s Triton, but it requires an entire machine be dedicated to running the head node with (at a minimum) 64GB of DRAM. Further, while it does provide an operations portal for configuring the system, the end-user portal requires you to sign-up for a support contract.

Why? SmartOS provides many benefits including running completely from DRAM. This is nice because I don’t have devote entire disk(s) for running the OS. The OS boots from a simple USB key where it loads its configuration and imports the ZFS datasets responsible for running your VM’s (zones/kvm). I won’t dive into the many benefits of ZFS here, but if you’re like me and value your data, you’ll appreciate it.

Because it boots from a USB key and the config is a single file, upgrades are extremely easy, just insert another USB key with an updated image and reboot. Boom.

So let’s get into the physical gear.

Servers:
* 1x Dell R720xd = 64GB RAM, 24x 300G 10K SAS + 1 SSD L2ARC
* 2x Dell R610 = 64GB RAM, 6x 250G SSD

Firewall/Router (not pictured):
* PCEngines APU2 = 2GB RAM, 30GB mSATA, 3 intel (igb) gigabit ports

Switch:
* Quanta LB4M 48port GB switch +2 10GB ports

Networking:
* Intel x520-da1 10Gbe (ixgbe) NIC on seach server
* Broadcom quad port 1gbe nic (bnx)
* Each server has two links to the switch. The first is a 1gbe link for the admin_nic and the second is a 10gbe for the trunk_nic which connects my zones/VMs to their respective VLANS.

I’ll layout the various VM’s I have running and why in a later post, or I’ll simply update this one at a later date.

MAAS Custom Partitioning

Currently, MAAS doesn’t support custom partitioning through the MAAS dashboard for CentOS. However, you can utilize curtin to perform this task for you.

Here’s an example /etc/maas/preseeds/curtin_userdata_centos assuming /dev/vda is your disk:

#cloud-config

verbosity: 3
showtrace: true

block-meta:
    format: gpt

partitioning_commands:
    builtin: []
    01_partition_announce: ["echo", "'### Partitioning disk ###'"]
    01_partition_make_label: ["/sbin/parted", "/dev/vda", "-s", "'","mklabel","gpt","'"]
    02_partition_make_part: ["/sbin/parted", "/dev/vda", "-s", "'","mkpart","primary","1M","2M","'"]
    03_partition_set_name: ["/sbin/parted", "/dev/vda", "-s", "'","set","1","bios_grub","on","'"]
    04_partition_make_part: ["/sbin/parted", "/dev/vda", "-s", "'","mkpart","primary","2M","512M","'"]
    05_partition_make_part: ["/sbin/parted", "/dev/vda", "-s", "'","mkpart","primary","512M","5G","'"]
    06_partition_make_part: ["/sbin/parted", "/dev/vda", "-s", "'","mkpart","primary","5G","10G","'"]
    07_partition_make_part: ["/sbin/parted", "/dev/vda", "-s", "'","mkpart","primary","10G","20G","'"]
    08_partition_make_part: ["/sbin/parted", "/dev/vda", "-s", "'","mkpart","primary","20G","3500G","'"]
    09_partition_make_part: ["/sbin/parted", "/dev/vda", "-s", "'","mkpart","primary","3500G","3508G","'"]
    10_partition_announce: ["echo", "'### Creating filesystems ###'"]
    12_partition_make_fs: ["/sbin/mkfs", "-t", "ext4", "/dev/vda2"]
    13_partition_make_fs: ["/sbin/mkfs", "-t", "ext4", "/dev/vda3"]
    14_partition_make_fs: ["/sbin/mkfs", "-t", "ext4", "/dev/vda4"]
    15_partition_make_fs: ["/sbin/mkfs", "-t", "ext4", "/dev/vda5"]
    16_partition_make_fs: ["/sbin/mkfs", "-t", "ext4", "/dev/vda6"]
    17_partition_make_swap: ["sh", "-c", "mkswap /dev/vda7"]
    18_partition_label_fs: ["/sbin/e2label", "/dev/vda2", "maas-boot"]
    19_partition_label_fs: ["/sbin/e2label", "/dev/vda3", "maas-root"]
    20_partition_label_fs: ["/sbin/e2label", "/dev/vda4", "maas-usr"]
    21_partition_label_fs: ["/sbin/e2label", "/dev/vda5", "maas-var"]
    22_partition_label_fs: ["/sbin/e2label", "/dev/vda6", "maas-home"]
    23_partition_mount_fs: ["sh", "-c", "mount /dev/vda3 $TARGET_MOUNT_POINT"]
    24_partition_mkdir: ["sh", "-c", "mkdir $TARGET_MOUNT_POINT/boot"]
    25_partition_mkdir: ["sh", "-c", "mkdir $TARGET_MOUNT_POINT/usr"]
    26_partition_mkdir: ["sh", "-c", "mkdir $TARGET_MOUNT_POINT/var"]
    27_partition_mkdir: ["sh", "-c", "mkdir $TARGET_MOUNT_POINT/home"]
    28_partition_mount_fs: ["sh", "-c", "mount /dev/vda2 $TARGET_MOUNT_POINT/boot"]
    29_partition_mount_fs: ["sh", "-c", "mount /dev/vda4 $TARGET_MOUNT_POINT/usr"]
    30_partition_mount_fs: ["sh", "-c", "mount /dev/vda5 $TARGET_MOUNT_POINT/var"]
    31_partition_mount_fs: ["sh", "-c", "mount /dev/vda6 $TARGET_MOUNT_POINT/home"]
    32_partition_announce: ["echo", "'### Filling /etc/fstab ###'"]
    33_partition_make_fstab: ["sh", "-c", "echo 'LABEL=maas-root / ext4 defaults 0 0' >> $OUTPUT_FSTAB"]
    34_partition_make_fstab: ["sh", "-c", "echo 'LABEL=maas-boot /boot ext4 defaults 0 0' >> $OUTPUT_FSTAB"]
    35_partition_make_fstab: ["sh", "-c", "echo 'LABEL=maas-usr /usr ext4 defaults 0 0' >> $OUTPUT_FSTAB"]
    36_partition_make_fstab: ["sh", "-c", "echo 'LABEL=maas-var /var ext4 defaults 0 0' >> $OUTPUT_FSTAB"]
    37_partition_make_fstab: ["sh", "-c", "echo 'LABEL=maas-home /home ext4 defaults 0 0' >> $OUTPUT_FSTAB"]
    38_partition_make_fstab: ["sh", "-c", "echo '/dev/vda7 none swap sw 0 0' >> $OUTPUT_FSTAB"]


debconf_selections:
 maas: |
  {{for line in str(curtin_preseed).splitlines()}}
  {{line}}
  {{endfor}}

late_commands:
  maas: [wget, '--no-proxy', '{{node_disable_pxe_url}}', '--post-data', '{{node_disable_pxe_data}}', '-O', '/dev/null']

Starting out in IT

I recently received an email from a family friend asking what courses or certifications he should look into for getting started in IT. Without knowing what particularly interests him about IT, I wrote the following email and decided it might be useful for others just starting out.

TL;DR: Learn Linux, a scripting language of some kind (Python, Javascript, Bash, etc.), and basics of networking.

I’d whole-heartedly recommend starting with some sort of Linux certification/course. This will provide a solid foundation for whatever direction you decide to take in the I.T. field, be it developer, networking, operations, sys admin., cyber-security etc. They all take root in Linux/Unix systems and having a solid background in it will definitely get you off the ground running.

After this, I’d recommend picking up some sort of scripting language (Python, Bash, Javascript), it doesn’t really matter which, just get really good with at least one and build some stuff with it (even silly/stupid stuff). As you progress in your career/education, you’ll naturally pick up others along the way.

Things I’ve learned the hard way:

– Be a team player and learn from each other. Nobody makes it on their own and everyone is better than you at *something*, learn from this.

– Don’t get discouraged. Everybody in IT was once where you are right now. You’ll never learn everything there is to know, and any employer or individual that expects you to, isn’t worth your time. IT is a life of learning.

– Leave ego at the door. This can sometimes be a difficult one and it may just be something you learn over time. I’ve interviewed several individuals that we passed on due to ego. Some of the best technologists I’ve worked with are those that always kept an open mind to different ways of doing things and didn’t succumb to one-up-man ship. It’s okay to be right, but be willing to entertain other points-of-view.

– Use the best tool for the job. There’s no single piece of technology for every task. Don’t pigeon-hole your skill-set. Just because you can make something work, doesn’t mean you should.